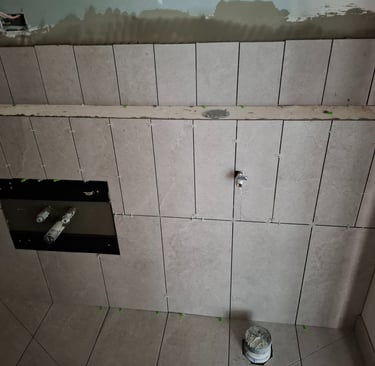
Step-by-Step Guide to DIY Wall and Floor Tile Installation
Want to save money and add a personal touch? Learn how to install wall and floor tiles yourself with a simple step-by-step guide for a professional finish.
9/25/20254 min read


Introduction
There’s something magical about stepping into a room you transformed with your own hands. DIY wall and floor tile installation isn’t just about saving money—it’s about the pride that comes with creating a stunning space yourself. Imagine the satisfaction of admiring a tiled wall or floor and thinking, “I did that.” This guide will walk you through the process, from bare surfaces to gleaming tiles, step by step.
Understanding Tile Installation
Wall tiling and floor tiling share similarities, but they’re not identical twins. Wall tiles are usually lighter, easier to cut, and often decorative. Floor tiles, on the other hand, need strength and durability to handle foot traffic. A common beginner’s mistake? Not preparing the surface properly. Tiles demand a smooth, level base—otherwise, you’ll end up with cracks, uneven edges, and frustration.
Choosing the Right Tiles
Not all tiles are created equal. Your choice can make or break your project.
Ceramic tiles: Affordable and versatile, great for walls.
Porcelain tiles: Tough and water-resistant, perfect for floors.
Natural stone tiles: Luxurious but require sealing.
Mosaic tiles: Excellent for decorative patterns.
For walls, lightweight ceramic or mosaic tiles often work best. Floors demand tougher porcelain or stone tiles that can handle pressure and daily wear.
Gathering Essential Tools and Materials
Before you dive in, gear up like a pro. Here’s your toolkit:
Tile cutter or wet saw
Notched trowel
Rubber mallet
Tile spacers
Spirit level
Grout float
Bucket and sponge
And don’t forget safety gear—gloves, goggles, and knee pads. Trust me, your knees will thank you.
Preparing the Surface
Tiles won’t forgive a bad foundation.
For walls: Scrape off old paint, fill cracks, and make sure the surface is flat.
For floors: Clean thoroughly, level the subfloor, and check for moisture issues.
Think of this as laying the groundwork for your masterpiece. A strong base means lasting beauty.
Measuring and Planning the Layout
Measure twice, cut once—it’s a golden rule. Sketch your layout and dry-lay tiles before applying adhesive. This prevents surprises and ensures symmetry. Ever seen a room where the last tile is a sliver? Planning avoids that eyesore.
Mixing the Tile Adhesive
Adhesive is the invisible hero of tiling. Choose between powdered thin-set or pre-mixed adhesive depending on your tiles. Mix to a peanut butter-like consistency—smooth, thick, and spreadable. Too runny, and tiles will slip. Too thick, and you’ll struggle to spread it.
Applying Adhesive to the Surface
Spread adhesive with a notched trowel, holding it at a 45-degree angle. This creates ridges that grip the tile securely. Apply only as much adhesive as you can cover in 10–15 minutes, or it will start drying out.
Laying the Tiles
Now comes the fun part. Press tiles firmly into place, twisting slightly to secure them. Use spacers to keep lines straight and joints even. Check alignment often with a spirit level—crooked tiles are a nightmare to fix later.
Cutting Tiles to Fit
Corners, outlets, and tricky edges require custom cuts.
Tile cutter: Best for straight cuts.
Wet saw: Ideal for thick or stone tiles.
Tile nippers: Perfect for small adjustments.
Measure carefully, cut slowly, and don’t rush—it’s precision work.
Installing Wall Tiles Step-by-Step
Start from the center bottom of the wall and work upward.
Use battens (temporary supports) to keep tiles from slipping.
Work in small sections so adhesive doesn’t dry before you place the tiles.
Installing Floor Tiles Step-by-Step
Begin in the center of the room and tile outward.
Check alignment regularly—crooked lines stand out on a floor.
Use a rubber mallet to gently tap tiles flat.
Grouting the Tiles
Once adhesive dries (usually 24 hours), it’s time to grout. Mix grout to a creamy texture and use a grout float to press it into the joints. Wipe away excess with a damp sponge before it hardens. Choosing a grout color close to your tile makes joints blend seamlessly, while a contrasting shade creates bold outlines.
Cleaning and Sealing the Tiles
After grout sets, haze may appear. Buff it off with a soft cloth. For natural stone or porous tiles, sealing is essential to protect from stains and moisture. Think of sealant as a shield that keeps your hard work looking flawless for years.
Final Touches and Maintenance Tips
Stand back, admire your work, and take a deep breath—you did it! To keep your tiles gleaming:
Mop floors regularly with a mild cleaner.
Avoid harsh chemicals that eat away grout.
Reseal tiles every couple of years if needed.
Conclusion
DIY tiling is more than a home project—it’s a journey of patience, precision, and pride. Yes, it takes effort, but the reward is priceless. Every tile you lay becomes part of your story, transforming your space into something uniquely yours. And every time you step into that room, you’ll feel that spark of accomplishment.
FAQs
1. How long does DIY tile installation take?
Depending on the size of the area, it can take anywhere from 1–3 days, including drying time for adhesive and grout.
2. Do I need to remove old tiles before installing new ones?
Yes, for best results. New tiles need a clean, level surface to adhere properly.
3. Can I tile directly onto wood floors?
Not recommended. Use a cement backer board over wood to create a stable base.
4. How do I stop wall tiles from sliding down while installing?
Use tile spacers and battens (temporary wooden supports) to hold tiles in place until adhesive sets.
5. Do I always need to seal tiles?
Not always. Porcelain and ceramic often don’t require sealing, but natural stone and unglazed tiles do.
